How to Create and Manage Pages
Pages are the building blocks of your WebCommander website. Each page represents a distinct section of your site, such as your homepage, About Us page, contact page, or custom landing pages. With WebCommander's page management system, you can create, organize, and control the visibility of all your website pages from one central location.
👥 Who this is for:Website owners, administrators, and team members with editing permissions who need to add or manage website content.
💡 Why it matters:Well-structured pages help visitors navigate your site easily, find information quickly, and take desired actions.
When to Use This Feature
- Launching a new website and building your core pages
- Adding seasonal landing pages or promotional pages
- Creating restricted content for specific customer groups
- Reorganising your website structure
- Building password-protected pages for exclusive content
- Duplicating existing pages to maintain consistent design
Prerequisites
Before you begin, ensure you have:
- An active WebCommander account (any subscription plan)
- Admin or editor role permissions
- A template installed on your account (comes with default layouts)
How to Create a New Page
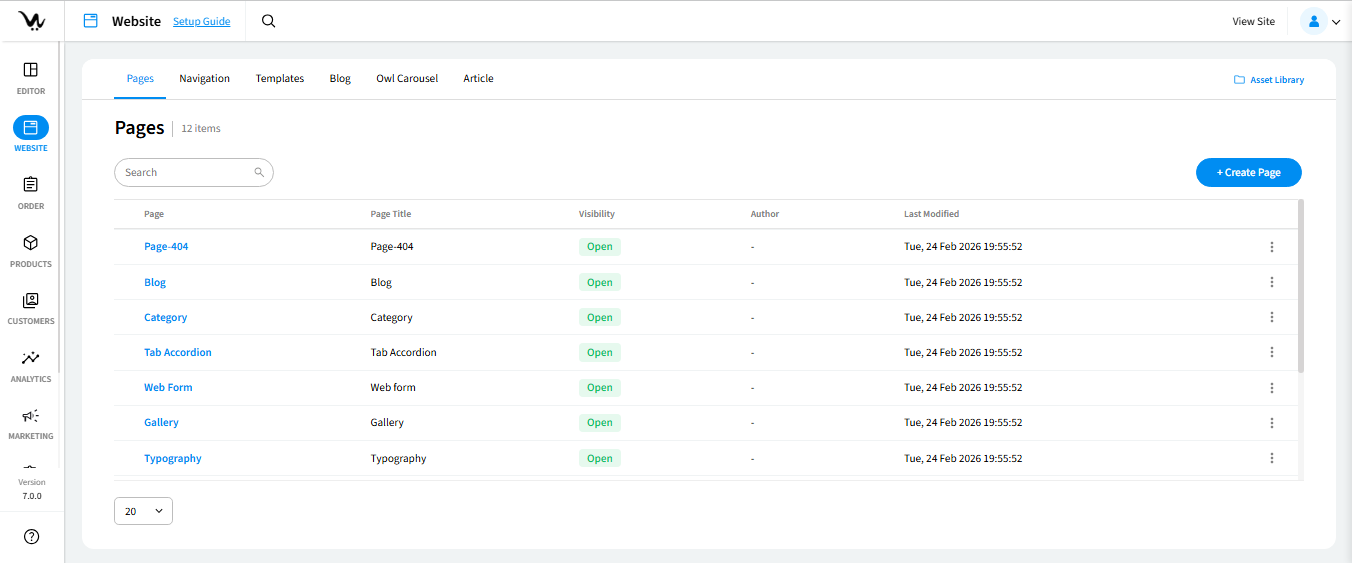
1. Access the Pages Section
- Click on the Website tab in the left-hand navigation menu
- You'll see a list of all your existing pages with their Page Names displayed
What you can do here:
- Review all existing pages in your site
- Rearrange page order using the up/down arrow buttons
- Access the three-dot menu (⋮) next to each page for additional actions
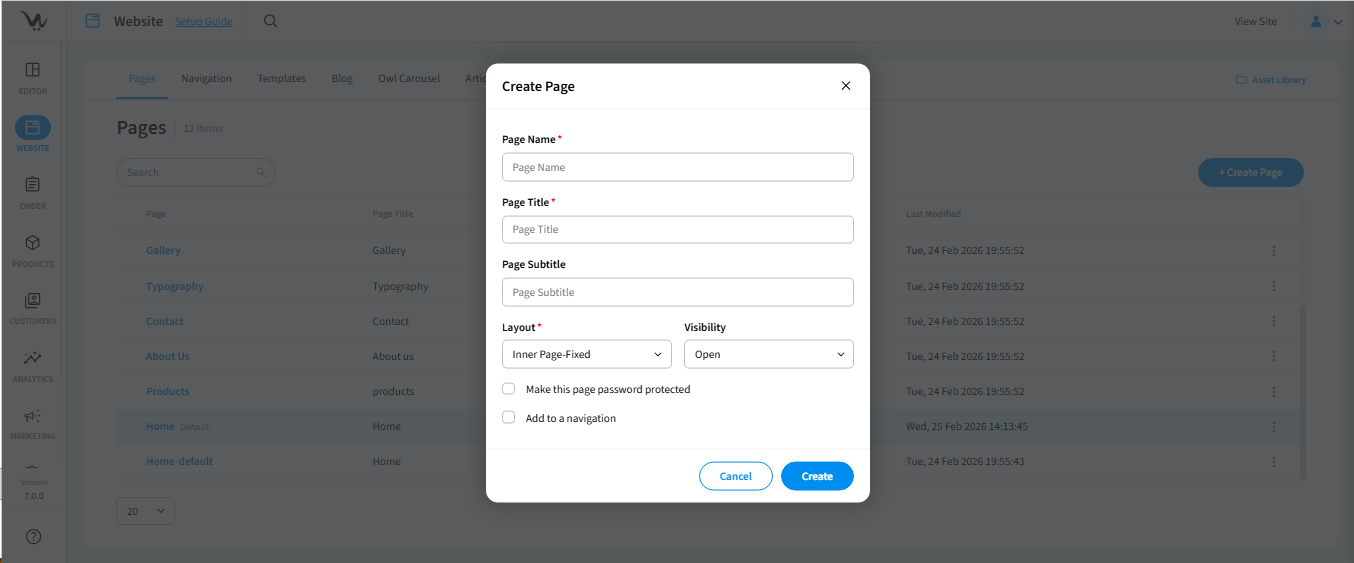
2. Create a New Page
- Click the Create Page button
- Enter a Page Name — this is your internal reference name that appears in the admin page list
- Enter a Page Title — this is the title visitors will see on the actual page
📝 Note:The system will auto-generate a URL slug based on your Page Title. You can edit this later through the SEO settings.
3. Choose a Layout
- Select a layout from the available options
- Common default layouts include:
- Home — Feature-rich layout for homepages
- Shop — Product-focused layout for e-commerce
- Blog — Content-optimized layout for articles
- Full Width — Maximized content area for landing pages
- Pick a structure that highlights your most important content
- Consider how you want to guide visitors toward taking action
- Preview available layouts in theLayout Sectionbefore deciding
Custom layouts: You can also create custom layouts from the Layout Section if the defaults don't meet your needs.
4. Set Visibility Options
Choose who can access your page:
| Visibility Option | Description | Best For |
|---|---|---|
| Open | Visible to everyone | Public pages, main content |
| Hidden | Page exists but isn't publicly accessible | Draft pages, work in progress |
| Restricted | Limit access to specific customer groups or individuals | Member-only content, VIP resources |
| Password-protected | Require a password to view (set password immediately) | Exclusive content, private resources |
5. Add to Navigation (Optional)
- Check the box labeled Add to navigation if you want this page to appear in your site menu
- The page will display wherever navigation widgets are placed on your site
- You can control navigation order and position later from the Navigation Management Section
6. Finalise Your Page
- Review all your settings
- Click the Create button
- You'll see a confirmation message and be redirected to the page list view
How to Manage Existing Pages
Accessing Page Actions
- Navigate to Website > Pages
- Locate the page you want to manage
- Click the three-dot menu (⋮) next to the page
Available Actions
Open with Editor
- Launch the visual editor to design and add content to your page
- This is typically your next step after creating a new page
Edit
- Modify page settings (name, title, layout, visibility)
- Update navigation settings
Copy
- Duplicate an existing page to maintain consistent design
- Useful for creating similar pages quickly
Configure SEO
- Edit the page URL slug
- Add meta descriptions and keywords
- Optimize page settings for search engines
Remove/Delete
- Permanently delete a page from your website
- You'll see a confirmation prompt before deletion to prevent accidental removal
Reordering Pages
- Use the up/down arrow buttons next to each page in the list
- Changes take effect immediately
- Page order in the admin list doesn't affect front-end navigation (manage that separately in Navigation Management)
Field and Option Reference
| Field/Option | Description | Required |
|---|---|---|
| Page Name | Internal reference name visible only in admin area | Yes |
| Page Title | Public-facing title displayed to visitors | Yes |
| Layout | Structural template that determines page sections (header, content, footer) | Yes |
| Visibility: Open | Page accessible to all visitors | - |
| Visibility: Hidden | Page exists but not publicly visible | - |
| Visibility: Restricted | Accessible only to selected customer groups or individuals | - |
| Visibility: Password-protected | Requires password entry to view | - |
| Add to navigation | Include page in site navigation menus | No |
Quick Tips and Best Practices
- Use descriptive Page Names — You'll thank yourself later when managing dozens of pages
- Choose layouts strategically — Match the layout structure to your content goals (conversions, reading, browsing)
- Keep important pages "Open" — Don't accidentally hide key pages like Contact or About Us
- Preview before publishing — Use "Hidden" visibility to perfect your page before making it live
- Leverage the Copy feature — Duplicate pages with similar designs to save time
- Optimise SEO early — Edit URL slugs and meta descriptions through Configure SEO soon after creation
Common Pitfalls to Avoid
- Forgetting to change visibility — Pages set to "Hidden" won't appear to visitors, even if added to navigation
- Not checking navigation — Adding a page to navigation doesn't automatically place it; ensure navigation widgets are configured
- Using vague page names — Names like "Page 1" or "New Page" make management difficult as your site grows
- Deleting pages without checking links — Other pages or menus might link to a page you're about to delete
- Ignoring URL slugs — Auto-generated slugs may not be SEO-friendly; review and edit them via Configure SEO
Troubleshooting
Solution:Check if you selected "Add to navigation" during creation. If not, edit the page and enable this option. Also verify that navigation widgets are properly placed in your template.
Solution:Use your browser's search function (Ctrl+F / Cmd+F) to search for the Page Name. If you have many pages, they may require scrolling.
Solution:Visit theLayout Sectionto preview all available layouts or create a custom layout that meets your specific needs.
Solution:Page deletions are permanent. You'll need to recreate the page. Always confirm carefully when the deletion prompt appears.
Solution:Double-check your customer group selections in the page visibility settings. Ensure the groups or individuals are correctly assigned.
Solution:Go to the three-dot menu (⋮) >Configure SEOand edit the URL slug to remove special characters or improve readability.